Apple has dropped support for macOS 10.12 Sierra on older and incompatible Mac hardware citing hardware limitations and lack of driver support for certain components. Nevertheless, some of these machines have been left out of contention despite featuring power-packed hardware such as the late 2008, early 2009 and mid 2009 models of MacBook Pro.
Avid macOS users have been complaining about Apple's indifferent approach to discourage software upgrades on older hardware, even when there are no serious hardware deficiencies for running the latest firmware. Several such unsupported devices can now run macOS 10.12 Sierra without any hassles, thanks to a tool by dosdude1 which is known as macOS Sierra Patcher.
Here's the complete list of devices that are officially supported for installing macOS 10.12 Sierra:
- MacBook (Late 2009) onwards
- iMac (Late 2009) onwards
- MacBook Air (2010) onwards
- MacBook Pro (2010) onwards
- Mac Mini (2010) onwards
- Mac Pro (2010) onwards
In contrast, the additional set of devices that can support macOS Sierra using the patch tool is listed in screenshot below:

It must be noted that a few of these machines are affected with specific issues like the lack of Wi-Fi access, due to unsupported network card and lack of compatible drivers. On the other hand, some mid 2007 iMac and MacBook Pros have unsupported CPU architecture with SSE4 incompatibility problems.
Nevertheless, those who own any of the models listed in the above screenshot may go ahead and install Sierra, using the instructions provided below.
Downloads Required
macOS Sierra Patcher from dosdude1
Steps to install macOS Sierra on older Macs
- Ensure you have an 8GB or larger USB drive or equivalent external hard drive partition, before you begin.
- Format the hard drive/USB drive as GUID Partition Map, Mac OS Extended (Journaled) via Disk utility app.
- Download macOS Sierra 10.12 via Mac App Store on a supported machine or a mirror copy through macOS Virtual Machine or a direct download link.
- Verify that the Install macOS Sierra app is copied to the /Applications folder.
- Download the macOS Sierra Patcher from dosdude1 from the link provided.
- Disable System Integrity Protection (SIP) on your machine before you proceed, as it could hinder the installation process.
- Now launch the macOS Sierra Patcher app and then click on the Sierra Installer icon to choose your copy of macOS Sierra. Then browse to your Applications folder and point to the Sierra Installer file.
- Click the Volume icon to choose the drive (external HDD or USB drive) where you want to create the modified version of Sierra Installer.
- After selecting the drive, hit Start Operation button to begin. You may need to enter your password when prompted. Let the installer complete creating the modified version of macOS Sierra files that can be installed on unsupported machines.
- Wait until the process completes and you'll see a confirmation message that says "complete" on the screen. The drive will now be renamed as 'OS X Base System' replacing the original name.
- Connect the newly-created USB bootable drive into the unsupported machine. Turn on the machine while holding down the alt or option key. At this moment, the machine will search for all bootable drives including the USB.
- Choose the USB Installer from the list of bootable drives and you will boot right into the macOS installer screen. Follow the onscreen instructions to complete the installation setup.
- In case you want to do a clean installation, use Disk Utility to erase the destination drive first. Otherwise, just perform a simple upgrade to save all your existing user data and settings on the machine. Let the installation continue and the machine should reboot halfway through the process.
- When the machine reboots, just press and hold alt/option key to the macOS installer screen. If you missed the screen, just shut down the machine by holding the Power button and then turn it on again. Now press and hold alt/option key as it boots to return to the installer screen.
- Now once again choose the USB installer (OS X Base System).
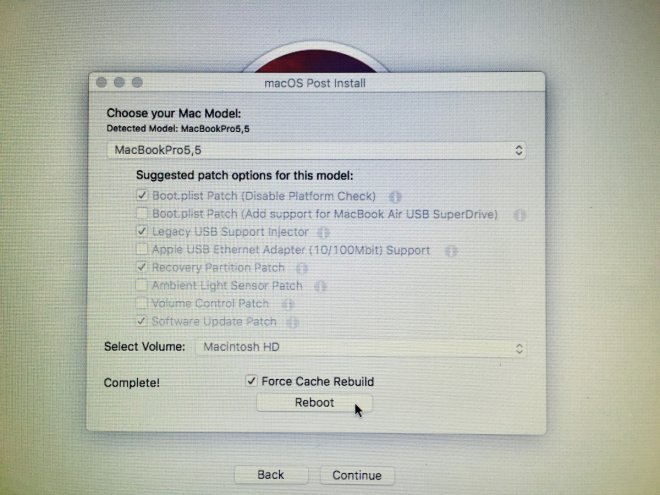
- Wait until the machine has booted into the USB installer and all the patches are installed. Now launch the utility called macOS Post Install.
- You can now verify your Mac model through the Post Install Utility and then select it from the drop-down list. Alternately, search your machine's model name and production year or use the Mactracker for Mac (click here) or for iOS (click here).
- Just tick the Recovery Partition Patch and let the utility take care of installing all necessary patches relevant to your model. Note: Your destination drive should be selected on any partition on your Mac and not the USB or external hard drive.

- Once all the patches are installed, just hit the reboot button. You may want to enable "Force Cache Rebuild" option before hitting 'Reboot' on the macOS Post Install screen, especially if you suspect that the patches have not installed correctly or if some system file got corrupted during the installation.
- Wait until the machine reboots and then hold down alt/option key for the last time. Now, you will be redirected to the boot drive selection screen. Just choose the hard drive where you just installed the modified version of Sierra (on the unsupported machine) to boot from it.
- Your Mac should now boot up into the newly installed macOS Sierra installation. In case you find that some of the features like Wi-Fi or USB are not working, just reboot the bootable USB or external drive with macOS Sierra setup files and run the patches again.
[Source: iDownloadBlog]


